
Hello friends! Hope you're having a wonderful day! I'd like to share one of the cards I made for the Tim Holtz 'Facebook Live' event on Friday. If you missed the event, you can still go to Tim's Facebook page to view a re-play. I'm loving ALL the Christmas Holiday Release. There's so much wonderful inspiration, you don't want to miss it… Tim seriously has one uber talented group of people, everyone of them totally rock! It's beginning to look a lot like Christmas around here and I can't wait! I have a full tutorial on this card, so grab a drink and pull up a chair...

I love all the layers in this card. I just can't get enough of that Translucent Embossing Paste and Distress Crayons! I like to start with a very neutral, but distress background.

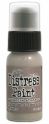
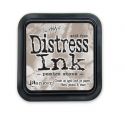
I squeezed a couple drops of Pumice Stone Distress Paint onto a Non-Stick Craft Sheet, and lightly misted the paint with water. I pressed the smooth side of the Distress Watercolor Cardstock into the paint mixture until covered. Then dried with a heat tool. To add more distress, I picked up droplets of color off the non stick craft sheet with Distress Watercolor Cardstock, blotting to pick up the color (not swiping), then drying with a heat tool

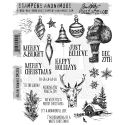
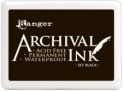
I used a simple masking technique to create the wreath. The reason I masked was to not lose the details of the pine needles and berries by over stamping. I stamped 2 of the pine images using Jet Black Archival Ink onto a sticky note and cut out. I lightly traced a circle using a pencil, centering it on the Distress Watercolor Cardstock. I used Fern Green Archival Ink to stamp the wreath, because the Archival Ink is completely waterproof when dry. I stamped the first pine image starting my circle, it's from the New Stampers Anonymous Tim Holtz Holiday Drawings CMS284 stamp set. Then applied the cutout pine mask to last stamped pine image, before stamping next pine image.

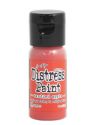
Right before I got to my last stamped pine image, I applied a pine mask to the first and next to last stamped pine images. Then stamped the last pine image to complete the circle/wreath (hope that makes sense). I erased any visible pencil marks left. Now for the berries, I used the nice bright Distress Candied Apple Paint. The end of a small paintbrush, made the perfect dotting tool. Use what works for ya, I always say {wink}. I just put one drop of the paint on the non stick craft sheet and dipped the end of my brush (a little bit will go a long way) then filled in where the image of berries were stamped…and maybe a few that weren't.

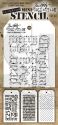
So, here's when I took a good look at my wreath and decided it needed just a little more depth to it. I went in with a second green Archival Ink and did just the tiniest bit of second generation stamping. I made sure my stamp was unmounted from the block, so I could bend it to only get small parts of the whole image. Inking only a small portion of the pine image stamp with Olive Archival Ink, I stamped onto a piece of scratch paper. Then, without re-inking the stamp, I stamped the image again onto portions of the wreath to create a lighter image than the first (on the scratch paper). Then dried with a heat tool. This step really did add quite a bit of depth to the overall aesthetics of the wreath. I anchored my card front to the nonstick craft sheet with a little painters tape, so it wouldn't move around on me. Next, I took the Stampers Anonymous Tim Holtz Mini Concerto Layering Stencil from set 20 and taped it down over the card front using painters tape. I applied a drop Pumice Stone Distress Paint onto the non stick craft sheet. Then picked up the color with a sponge blotting onto the non-stick craft sheet until the color covered the bottom of the sponge, but yet was pretty dry to the touch. If your sponge isn't very dry, the color will seep in under the stencil and you don't want that. I applied color over the layering stencil in a circular motion, until I had a light wash of subtle color. I did move my stencil, to the second half of the card to continue the color.

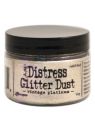
To create a little more dimension, I used Rangers Gloss Transparent Texture Paste and Distress Glitter Dust. I chose the words "Merry, Christmas and 25" from the Stampers Anonymous Tim Holtz Mini Holiday Script Layering Stencil from set 20. With my card front still anchored with painters tape to non stick craft sheet, I attached the Mini Holiday Script Layering Stencil to the card front with painters tape as well (I didn't want it to move around on me). I made sure that the wording "Merry" was positioned over the top left-hand corner of my wreath. I scooped out about one teaspoon of Rangers Gloss Transparent Texture Paste and smeared onto the non stick craft mat with one of the Ranger Palette Knives. Then I added a smidgen (pinky nail size) of Distress Glitter Dust to the wet paste and mixed well with the palette knife. A little bit of the glitter dust goes a long way, you can always add more but you can't take it away. Using a palette knife, start at the top and swipe Texture Paste down over the stencil and fill in wording. Try not to overwork the transparent texture paste it has a thinner consistency versus the original opaque texture paste and will seep under the stencil. Immediately lift the stencil off of the card front and clean the paste out of the stencil. You can wait for each word/number to dry before going onto the next or just VERY CAREFULLY do them all at the same time. Yep, I waited for each one to air dry before going to the next :) It dries relatively quickly only about 10 minutes or so depending on how thick you've applied the paste. It is the coolest product, once the paste is dry it's completely transparent!

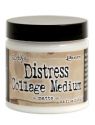
Now the transparent texture paste is a sealed surface once it dries, but I wanted my card front to be a sealed surface too. I brushed a thin coating of Distress Collage Matte Medium all over the card front surface and in all the nooks and crannies of the wording. It only took a couple of minutes to dry. Guess what…it changed the look of my translucent glossy texture paste to matte…duh. When you use the matte transparent paste or in my case the Distress Matte Collage Medium, the Distress Glitter Dust inclusions become muted. You can still see them no problem they are just not as sparkly. Well, I wanted glossy and sparkly. No big deal, I just matched up the layering stencil and added another thin layer of glitter transparent texture paste to the existing words and numbers. Voila, glossy and sparkly again!

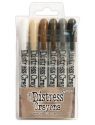
I smeared a little Vintage Photo and Walnut Stain Distress Crayons on the raised transparent texture paste, really working it into the nooks and crannies with my finger. I buffed off the excess with a dry towel and also worked crayon around the rest of the card at the same time. If I needed to additionally lighten any areas up, I just spritzed my towel with a bit of water and buff off crayon till I was happy with level of shading. I just love the dramatic old world look it gives!

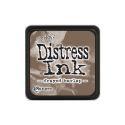
I'm quite smitten with this deer, it's from the New Stampers Anonymous Tim Holtz Holiday Drawings CMS284 stamp set. I need the larger one too! I stamped the deer image onto Distress Watercolor Cardstock (smooth side) using Jet Black Archival Ink. Then dried with a heat tool. I watercolored the stamped deer image with Distress Inks and a Detailed Water Brush. The colors I used were - Antique Linen, Tattered Rose, Pumice Stone, Frayed Burlap and Walnut Stain. I just swiped a little of the Distress Inks onto the non stick craft mat and picked the color up with the detailed water brush. I colored a little then would dry with heat tool. I made sure to clean my water brush between colors. After I was happy with the color of my deer, I cut him out with scissors and a craft knife.

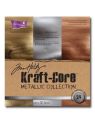
I cut a piece of gold Kraft-Core 4 1/8 x 5 1/4. Making sure to protect my non stick craft mat with a scratch piece of paper, I sanded only in an up-and-down motion on the metallic Kraft-Core with a sanding grip for a fun patina look. Then I shaded the edges with Walnut Stain Distress Ink and a blending tool with foam. Then distressed the edges of the metallic Kraft-Core with a bone folder. I also cut a piece of brown #21 Kraft-Core 5 1/2 x 8 1/2, then sanded a little to expose kraft and folded in half for card base.

I highlighted "tidings" on a Christmas Typed Token with some Picket Fence Distress Crayon. I just smeared a little on and wiped off the excess with a towel. I grudged up the token with a little mushroom alcohol ink and applicator tool. I did have to trim down my card front a bit to fit and still be able to see the gold Kraft-Core. I distress the paper edges with a bone folder. I attached my cutout deer with low profile foam squares to the center of the wreath. Then added some linen ribbon and the Christmas Typed Token. I layered everything up and done!

I have a second card that I will have a tutorial on in a couple of days. I had so much fun making this for Tim's Facebook Live event, I hope you give it a try! You can find the supplies I've used via the links below. If you have any questions please let me know I love your comments, I truly appreciate each and everyone of them! As always thanks for stopping by and I'll see you next time! xx

 |  |  |  |  |
 |  |  |  |  |
 |  |  |  |  |
 |  |  |  |  |
 |  |  |  |  |
 |  |  |  |  |
 |  |  |  |  |
 |  |  |

Stunning card, right up my street especially because you have added layers of interest to your design. Adore it Bobbi and wonderful attention to detail too. Tracy x
ReplyDeleteThank you Tracy, I love incorporating little details.
DeleteThis is fantastic! Thanks so much for the tutorial! Look forward to your next one!
ReplyDeleteBobbi - I saw this on Tim's Live Facebook and it is just STUNNING. The pictures here are lovely but in person it is truly a KNOCKOUT. And... Tim thought so too :) Way to go!!! Thanks bunches for the super step by step. MERRY CHRISTMAS - eheheheheh!!! j.
ReplyDeleteThanks so much Joi!
DeleteJust beautiful! Love all of the distress tips and techniques!
ReplyDeleteYou are super talented! This card is so inspiring. I love all the layers, the foil is a wonderfully festive touch. I am in awe of the transparent paste with glitter dust and can not wait to try it out. Thank you so much for sharing your creativity and recipe for the technique! Absolutely beautiful card!
ReplyDeleteAnn you are too kind, I just love making things and sharing :)
DeleteThanks for sharing your gorgeous card and the tutorial. Very impressive!! Love it!!
ReplyDeleteMy pleasure Christina and thank you for stopping by!
DeleteBobbi! You have positively done it, again! I am SOOO inspired by your work! Your tutorial reads like you're sitting at my desk, walking me through each step...even the part that you "fixed", making your font "glossy and sparkly", again. At the moment, I'm away from all my crafty things, for a few more weeks, yet, but you can bet I'll be diving into Christmas, as soon as I get back! You know...I have continued to use that distressing/embossing, (on the foil card stock) that you were so sweet to walk me through, year before last...now it's perfect every single time ☺️ Thanks so much for sharing your talents with us!
ReplyDeleteAwwww, thanks Mel! I hope you are having a wonderful time with your son. I'm so happy I could help with the embossing :)
DeleteAbsolutely BRILLIANT Bobbi!!! So much info packed in with great tips and techniques and a finish that had us all gasping on Tim's video. Awesome work!! xx
ReplyDeleteBobbi your card is astonishing! I was so curious about the techniques you used on it and all I can say is that you are just amazing. Your work is so inspiring 💕 thank you for sharing it with us. 😊
ReplyDeleteThis is stunning Bobbi! Thanks for sharing how you pulled it all together.
ReplyDeleteThanks Deb, I appreciate you stopping by!
DeleteLove this card! Especially love the Merry Christmas 25 effect on it and that you used the distressed crayons to get the vintage effect! Sigh... Wish my new stamps and stencils were here now! And I ordered the WRONG size of the Christmas word stencil... Oh wallet come here we need to order again!!!
ReplyDeleteThanks for the step by step Bobbi. Both your cards were stunning. I always learn so much from you and the other designers and am so grateful you all take the time to show off your talent. Do you have a tutorial for your distressed edges with the bone folder? They just add so much to your cards. Beautiful
ReplyDeleteThank you Joy! I don't really have a tutorial on the distressed edges. Nothing to it though… just hold your card stock firmly close to the edge running the bone folder along the edge until the card stock is bent and crinkled. Hope that helps.
DeleteI LOVE LOVE LOVE this card Bobbi! Thanks for sharing your tutorial with us, I love the background technique with pumice stone and the stamped wreath and translucent paste with glitter is so clever. Did I mention I LOVE LOVE LOVE this? ;)
ReplyDeleteI did a screenshot of your card during the Live event because I fell in LOVE with it!!! No way I could have figured out all those techniques on my own. Thank you so much for taking the time to post your process. The step by step is awesome! Looking forward to seeing more of your creations!
ReplyDeleteThis is a real stunner Bobbi, I love the beautiful face of the deer and the way the translucent embossing paste turned out. Thank you for sharing this wonderful tutorial too! Anne xx
ReplyDeleteBobbi!!! This is so brilliant! i adore your use of translucent paste and Distress crayons! Surely I'll try this technique, it's fabulous! barbara
ReplyDelete